Difference: PuTTY (1 vs. 10)
Revision 102015-11-25 - ChrisBrew
PuTTY, Exceed, SSH
Setting up a PuTTY profile for accessing the PPD Linux serversThe section describes how to use configure PuTTy so that you can create an X session using the ssh protocol. To start PuTTy on one of the PPD desktop Windows clones just type the command "PuTTy" at the command prompt. This will produce a window similar to the one below. The first configuration changes are to specify the SSH protocol and the host name to which you will want to connect (these have already been done in the image below):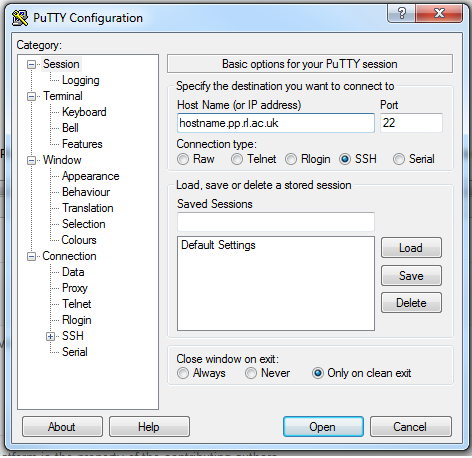 The next step is to click on the 'Connection' then 'Data' category on the Putty screen, and fill in the username you will use on the remote system: An example is shown below:  Next click on the 'SSH' 'X11' configuration panel and select the "Enable X11 forwarding" check-box:  Next select the 'SSH' configuration panel. Here specify the preferred SSH protocol version (2) and the remote command that will be executed on the remote system. In this case shown the remote command will launch an X session with the KDE window manager: 
Please note that the "Remote command" in the screenshot no longer works, but alternative commands that you may find useful are:
Or you can download all profiles in a one file: All profiles ExceedExceed can be configured to work with X11 forwarding by doing the following:
| ||||||||||||||||||||||||||||||||||||||||
| Added: | ||||||||||||||||||||||||||||||||||||||||
| > > |
| |||||||||||||||||||||||||||||||||||||||
Revision 92015-09-04 - ChrisBrew
PuTTY, Exceed, SSH
Setting up a PuTTY profile for accessing the PPD Linux serversThe section describes how to use configure PuTTy so that you can create an X session using the ssh protocol. To start PuTTy on one of the PPD desktop Windows clones just type the command "PuTTy" at the command prompt. This will produce a window similar to the one below. The first configuration changes are to specify the SSH protocol and the host name to which you will want to connect (these have already been done in the image below):The next step is to click on the 'Connection' then 'Data' category on the Putty screen, and fill in the username you will use on the remote system: An example is shown below: Next click on the 'SSH' 'X11' configuration panel and select the "Enable X11 forwarding" check-box: Next select the 'SSH' configuration panel. Here specify the preferred SSH protocol version (2) and the remote command that will be executed on the remote system. In this case shown the remote command will launch an X session with the KDE window manager:
Please note that the "Remote command" in the screenshot no longer works, but alternative commands that you may find useful are:
Or you can download all profiles in a one file: All profiles ExceedExceed can be configured to work with X11 forwarding by doing the following:
| ||||||||||||||||||||||||||
| Changed: | ||||||||||||||||||||||||||
| < < |
| |||||||||||||||||||||||||
| > > |
| |||||||||||||||||||||||||
| ||||||||||||||||||||||||||
| Changed: | ||||||||||||||||||||||||||
| < < |
| |||||||||||||||||||||||||
| > > |
| |||||||||||||||||||||||||
| ||||||||||||||||||||||||||
| Changed: | ||||||||||||||||||||||||||
| < < |
| |||||||||||||||||||||||||
| > > |
| |||||||||||||||||||||||||
Revision 82014-07-11 - FedericoMelaccio
PuTTY, Exceed, SSH
Setting up a PuTTY profile for accessing the PPD Linux serversThe section describes how to use configure PuTTy so that you can create an X session using the ssh protocol. | ||||||||||||||||||||||
| Changed: | ||||||||||||||||||||||
| < < | To start PuTTy on one of the PPD desktop Windows clones just type the command "PuTTy" at the command prompt. This will produce a window similar to the one below. The first configuration changes are to specify the SSH protocol and the host name to which you will want to connect (these have already been done in the image below): The next step is to click on the 'Connection' then 'Data' category on the Putty screen, and fill in the username you will use on the remote system: An example is shown below: Next click on the 'SSH' 'X11' configuration panel and select the "Enable X11 forwarding" check-box: Next select the 'SSH' configuration panel. Here specify the preferred SSH protocol version (2) and the remote command that will be executed on the remote system. In this case shown the remote command will launch an X session with the KDE window manager: | |||||||||||||||||||||
| > > | To start PuTTy on one of the PPD desktop Windows clones just type the command "PuTTy" at the command prompt. This will produce a window similar to the one below. The first configuration changes are to specify the SSH protocol and the host name to which you will want to connect (these have already been done in the image below): The next step is to click on the 'Connection' then 'Data' category on the Putty screen, and fill in the username you will use on the remote system: An example is shown below: Next click on the 'SSH' 'X11' configuration panel and select the "Enable X11 forwarding" check-box: Next select the 'SSH' configuration panel. Here specify the preferred SSH protocol version (2) and the remote command that will be executed on the remote system. In this case shown the remote command will launch an X session with the KDE window manager: | |||||||||||||||||||||
|
Please note that the "Remote command" in the screenshot no longer works, but alternative commands that you may find useful are: | ||||||||||||||||||||||
| Deleted: | ||||||||||||||||||||||
| < < |
| |||||||||||||||||||||
| Added: | ||||||||||||||||||||||
| > > |
| |||||||||||||||||||||
Or you can download all profiles in a one file: | ||||||||||||||||||||||
| Changed: | ||||||||||||||||||||||
| < < | All profiles | |||||||||||||||||||||
| > > | All profiles | |||||||||||||||||||||
ExceedExceed can be configured to work with X11 forwarding by doing the following: | ||||||||||||||||||||||
| Changed: | ||||||||||||||||||||||
| < < |
| |||||||||||||||||||||
| > > | ||||||||||||||||||||||
| Added: | ||||||||||||||||||||||
| > > | | |||||||||||||||||||||
| ||||||||||||||||||||||
| Added: | ||||||||||||||||||||||
| > > |
| |||||||||||||||||||||
Revision 72011-07-28 - RobHarper
PuTTY, Exceed, SSH | ||||||||||||||||||||||
| Changed: | ||||||||||||||||||||||
| < < |
| |||||||||||||||||||||
| > > | PuTTY is in fact a suite of programs (see the help available within PuTTY for details) and these are all available via the command line. The main application (just called puTTY) creates a terminal window and establishes a connection to a remote host. On PPD Windows 7 desktop systems PuTTy is available from the Start Menu. -> All Programs -> General Utilities -> PuTTy. It is also available by typing PuTTy at the command prompt. | |||||||||||||||||||||
Setting up a PuTTY profile for accessing the PPD Linux serversThe section describes how to use configure PuTTy so that you can create an X session using the ssh protocol. | ||||||||||||||||||||||
| Changed: | ||||||||||||||||||||||
| < < |
| |||||||||||||||||||||
| > > | To start PuTTy on one of the PPD desktop Windows clones just type the command "PuTTy" at the command prompt. This will produce a window similar to the one below. The first configuration changes are to specify the SSH protocol and the host name to which you will want to connect (these have already been done in the image below): The next step is to click on the 'Connection' then 'Data' category on the Putty screen, and fill in the username you will use on the remote system: An example is shown below: Next click on the 'SSH' 'X11' configuration panel and select the "Enable X11 forwarding" check-box: Next select the 'SSH' configuration panel. Here specify the preferred SSH protocol version (2) and the remote command that will be executed on the remote system. In this case shown the remote command will launch an X session with the KDE window manager: | |||||||||||||||||||||
| Changed: | ||||||||||||||||||||||
| < < | Alternative commands that you may find useful are: | |||||||||||||||||||||
| > > | Please note that the "Remote command" in the screenshot no longer works, but alternative commands that you may find useful are:
| |||||||||||||||||||||
| Deleted: | ||||||||||||||||||||||
| < < |
| |||||||||||||||||||||
Or you can download all profiles in a one file: | ||||||||||||||||||||||
| Changed: | ||||||||||||||||||||||
| < < | ||||||||||||||||||||||
| > > | All profiles | |||||||||||||||||||||
ExceedExceed can be configured to work with X11 forwarding by doing the following: | ||||||||||||||||||||||
| Changed: | ||||||||||||||||||||||
| < < |
| |||||||||||||||||||||
| > > |
| |||||||||||||||||||||
| Deleted: | ||||||||||||||||||||||
| < < |
| |||||||||||||||||||||
| ||||||||||||||||||||||
Revision 62011-07-18 - LukaszKaczor
PuTTY, Exceed, SSH | ||||||||||||||||||||||
| Changed: | ||||||||||||||||||||||
| < < | PuTTY is in fact a suite of programs (see the help available within PuTTY for details) and these are all available via the command line. The main application (just called puTTY) creates a terminal window and establishes a connection to a remote host. | |||||||||||||||||||||
| > > |
| |||||||||||||||||||||
Setting up a PuTTY profile for accessing the PPD Linux serversThe section describes how to use configure PuTTy so that you can create an X session using the ssh protocol. | ||||||||||||||||||||||
| Changed: | ||||||||||||||||||||||
| < < | To start PuTTy on one of the PPD desktop Windows clones just type the command "PuTTy" at the command prompt. This will produce a window similar to the one below. The first configuration changes are to specify the SSH protocol and the host name to which you will want to connect (these have already been done in the image below): | |||||||||||||||||||||
| > > |
| |||||||||||||||||||||
|
Alternative commands that you may find useful are: | ||||||||||||||||||||||
| Changed: | ||||||||||||||||||||||
| < < | ||||||||||||||||||||||
| > > | ||||||||||||||||||||||
| ||||||||||||||||||||||
| Changed: | ||||||||||||||||||||||
| < < | ||||||||||||||||||||||
| > > | ||||||||||||||||||||||
|
Or you can download all profiles in a one file: | ||||||||||||||||||||||
| Changed: | ||||||||||||||||||||||
| < < | All profiles | |||||||||||||||||||||
| > > | ||||||||||||||||||||||
ExceedExceed can be configured to work with X11 forwarding by doing the following: | ||||||||||||||||||||||
| Changed: | ||||||||||||||||||||||
| < < | ||||||||||||||||||||||
| > > | ||||||||||||||||||||||
| ||||||||||||||||||||||
| Changed: | ||||||||||||||||||||||
| < < | ||||||||||||||||||||||
| > > | ||||||||||||||||||||||
| ||||||||||||||||||||||
Revision 52011-07-12 - RobHarper
PuTTY, Exceed, SSHPuTTY is in fact a suite of programs (see the help available within PuTTY for details) and these are all available via the command line. The main application (just called puTTY) creates a terminal window and establishes a connection to a remote host. Setting up a PuTTY profile for accessing the PPD Linux serversThe section describes how to use configure PuTTy so that you can create an X session using the ssh protocol.To start PuTTy on one of the PPD desktop Windows clones just type the command "PuTTy" at the command prompt. This will produce a window similar to the one below. The first configuration changes are to specify the SSH protocol and the host name to which you will want to connect (these have already been done in the image below): Alternative commands that you may find useful are:
| |||||||||||||||||||
| Changed: | |||||||||||||||||||
| < < |
| ||||||||||||||||||
| > > |
| ||||||||||||||||||
|
Or you can download all profiles in a one file: All profiles ExceedExceed can be configured to work with X11 forwarding by doing the following:
| |||||||||||||||||||
Revision 42011-05-19 - LukaszKaczor
PuTTY, Exceed, SSHPuTTY is in fact a suite of programs (see the help available within PuTTY for details) and these are all available via the command line. The main application (just called puTTY) creates a terminal window and establishes a connection to a remote host. Setting up a PuTTY profile for accessing the PPD Linux serversThe section describes how to use configure PuTTy so that you can create an X session using the ssh protocol.To start PuTTy on one of the PPD desktop Windows clones just type the command "PuTTy" at the command prompt. This will produce a window similar to the one below. The first configuration changes are to specify the SSH protocol and the host name to which you will want to connect (these have already been done in the image below): Alternative commands that you may find useful are:
Or you can download all profiles in a one file: All profiles ExceedExceed can be configured to work with X11 forwarding by doing the following:
| ||||||||||||||||||||||||||||||||
| Deleted: | ||||||||||||||||||||||||||||||||
| < < |
| |||||||||||||||||||||||||||||||
| ||||||||||||||||||||||||||||||||
| Added: | ||||||||||||||||||||||||||||||||
| > > |
| |||||||||||||||||||||||||||||||
Revision 32011-01-28 - LukaszKaczor
PuTTY, Exceed, SSHPuTTY is in fact a suite of programs (see the help available within PuTTY for details) and these are all available via the command line. The main application (just called puTTY) creates a terminal window and establishes a connection to a remote host. Setting up a PuTTY profile for accessing the PPD Linux serversThe section describes how to use configure PuTTy so that you can create an X session using the ssh protocol.To start PuTTy on one of the PPD desktop Windows clones just type the command "PuTTy" at the command prompt. This will produce a window similar to the one below. The first configuration changes are to specify the SSH protocol and the host name to which you will want to connect (these have already been done in the image below): Alternative commands that you may find useful are: | ||||||||||||||||||||||
| Changed: | ||||||||||||||||||||||
| < < |
Yo can also download one of our preconfigured profiles here: | |||||||||||||||||||||
| > > |
| |||||||||||||||||||||
| Changed: | ||||||||||||||||||||||
| < < | xterm profile Or you can download all profiles in a one file: All profiles | |||||||||||||||||||||
| > > | Or you can download all profiles in a one file: | |||||||||||||||||||||
| Added: | ||||||||||||||||||||||
| > > | All profiles | |||||||||||||||||||||
ExceedExceed can be configured to work with X11 forwarding by doing the following:
| ||||||||||||||||||||||
Revision 22011-01-27 - LukaszKaczor
PuTTY, Exceed, SSHPuTTY is in fact a suite of programs (see the help available within PuTTY for details) and these are all available via the command line. The main application (just called puTTY) creates a terminal window and establishes a connection to a remote host. Setting up a PuTTY profile for accessing the PPD Linux serversThe section describes how to use configure PuTTy so that you can create an X session using the ssh protocol. | |||||||||||||||
| Changed: | |||||||||||||||
| < < | To start PuTTy on one of the PPD desktop Windows clones just type the command "PuTTy" at the command prompt. This will produce a window similar to the one below. The first configuration changes are to specify the SSH protocol and the host name to which you will want to connect (these have already been done in the image below): The next step is to click on the 'Connection' then 'Data' category on the Putty screen, and fill in the username you will use on the remote system: An example is shown below: Next click on the 'SSH' 'X11' configuration panel and select the "Enable X11 forwarding" check-box: Next select the 'SSH' configuration panel. Here specify the preferred SSH protocol version (2) and the remote command that will be executed on the remote system. In this case shown the remote command will launch an X session with the KDE window manager: Alternative commands that you may find useful are: | ||||||||||||||
| > > | To start PuTTy on one of the PPD desktop Windows clones just type the command "PuTTy" at the command prompt. This will produce a window similar to the one below. The first configuration changes are to specify the SSH protocol and the host name to which you will want to connect (these have already been done in the image below): | ||||||||||||||
| Added: | |||||||||||||||
| > > | Alternative commands that you may find useful are: | ||||||||||||||
| |||||||||||||||
| Added: | |||||||||||||||
| > > | Yo can also download one of our preconfigured profiles here: | ||||||||||||||
| Changed: | |||||||||||||||
| < < | Yo can also download one of our preconfigured profiles here: | ||||||||||||||
| > > | xterm profile Or you can download all profiles in a one file: All profiles | ||||||||||||||
| Changed: | |||||||||||||||
| < < | xterm profile twm profile kde session profile gnome session profile Failsafe xterm profile profile default type of session profile profile Or you can download all profiles in a one file: All profiles | ||||||||||||||
| > > | Exceed | ||||||||||||||
| Added: | |||||||||||||||
| > > |
Exceed can be configured to work with X11 forwarding by doing the following:
| ||||||||||||||
| |||||||||||||||
Revision 12011-01-26 - LukaszKaczor
PuTTY, Exceed, SSHPuTTY is in fact a suite of programs (see the help available within PuTTY for details) and these are all available via the command line. The main application (just called puTTY) creates a terminal window and establishes a connection to a remote host. Setting up a PuTTY profile for accessing the PPD Linux serversThe section describes how to use configure PuTTy so that you can create an X session using the ssh protocol.To start PuTTy on one of the PPD desktop Windows clones just type the command "PuTTy" at the command prompt. This will produce a window similar to the one below. The first configuration changes are to specify the SSH protocol and the host name to which you will want to connect (these have already been done in the image below): The next step is to click on the 'Connection' then 'Data' category on the Putty screen, and fill in the username you will use on the remote system: An example is shown below: Next click on the 'SSH' 'X11' configuration panel and select the "Enable X11 forwarding" check-box: Next select the 'SSH' configuration panel. Here specify the preferred SSH protocol version (2) and the remote command that will be executed on the remote system. In this case shown the remote command will launch an X session with the KDE window manager: Alternative commands that you may find useful are:
Yo can also download one of our preconfigured profiles here: xterm profile twm profile kde session profile gnome session profile Failsafe xterm profile profile default type of session profile profile Or you can download all profiles in a one file: All profiles
|
View topic | History: r10 < r9 < r8 < r7 | More topic actions...
Ideas, requests, problems regarding TWiki? Send feedback