Difference: SSHPUTTY (1 vs. 4)

Revision 42018-11-09 - ChrisBrew

 
META TOPICPARENT name="WebHome"

How to use SSH keys with PuTTY

This article describes how to use PuTTY for passwordless SSH access via public/private key pairs.

  • Open the PuTTYgen utility which comes along the PuTTY suite of programs:
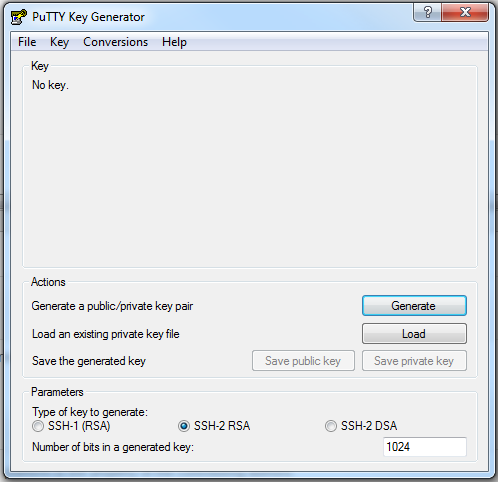
PuTTYgen1.png

  • Click on Generate to start generating a public/private key pair
  • You are asked to generate some randomness by moving the mouse on the area below the progress bar:
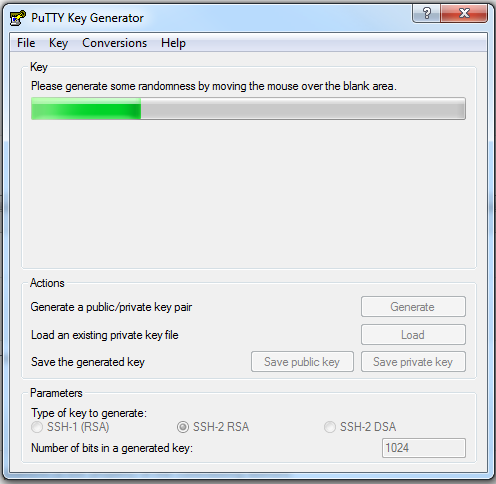
PuTTYgen2.png

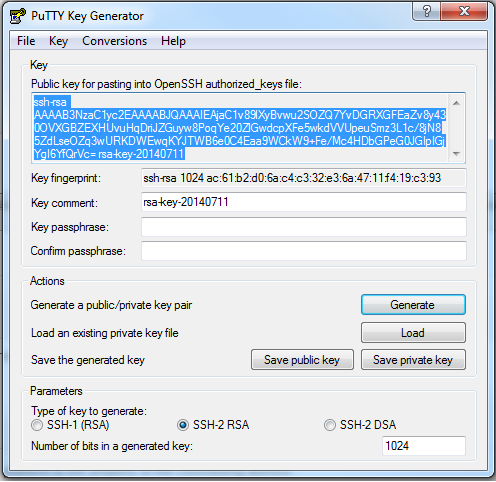
  • When done the public key is shown and the Save buttons are enabled:
PuTTYgen3.png

  • Optionally you can enter a passphrase to protect your private key, please do so!
  • Click on "Save private key":
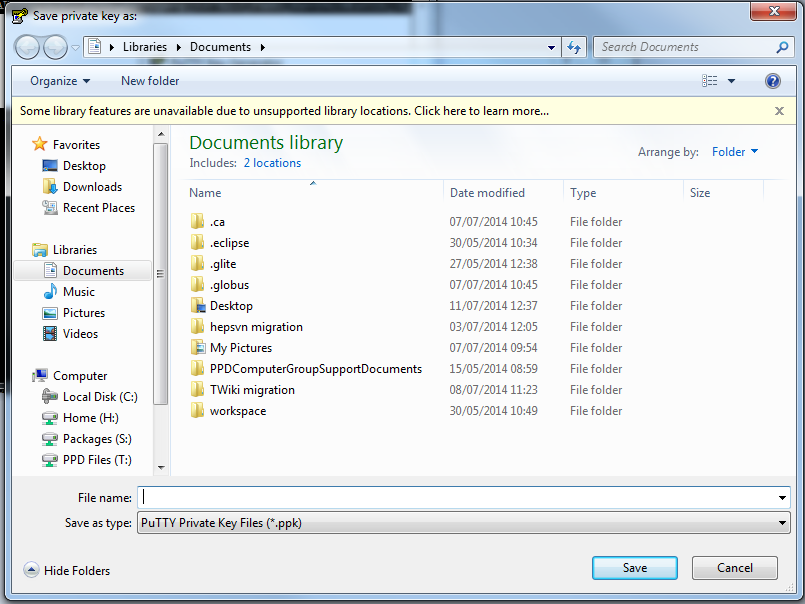
PuTTYgen5.png

  • Enter a name and select a destination folder, then click "Save". IMPORTANT: This file MUST reside on your computer and it cannot leave it or be sent over any network.
  • Do likewise for the public key (click on "Save public key").
  • Now go back to the PuTTYgen main screen and select the public key with the mouse, right click on the selection and copy it.
  • Open a new PuTTY session to the Linux machine you want to connect via those SSH keys.
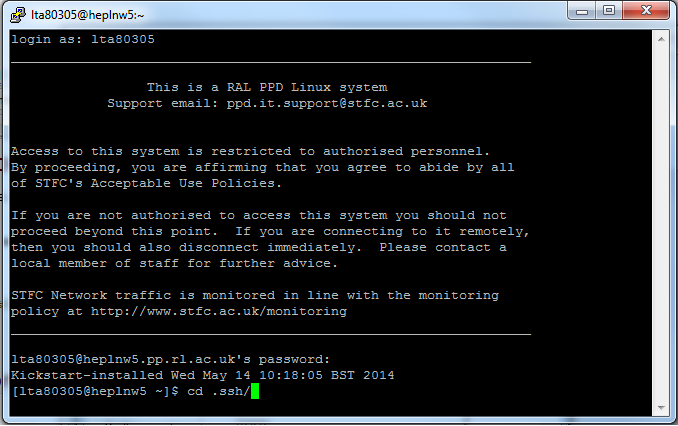
  • At prompt, cd to .ssh/ folder:
authkey1.png

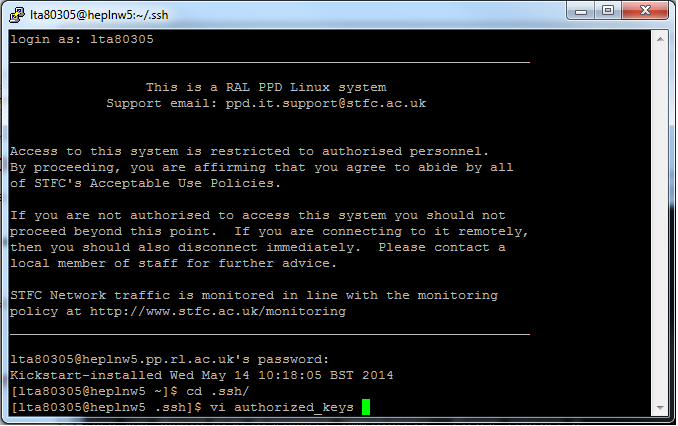
  • With a text editor of your choice, open the authorized_keys file. If not existing, an empty one will be created:
authkey2.png

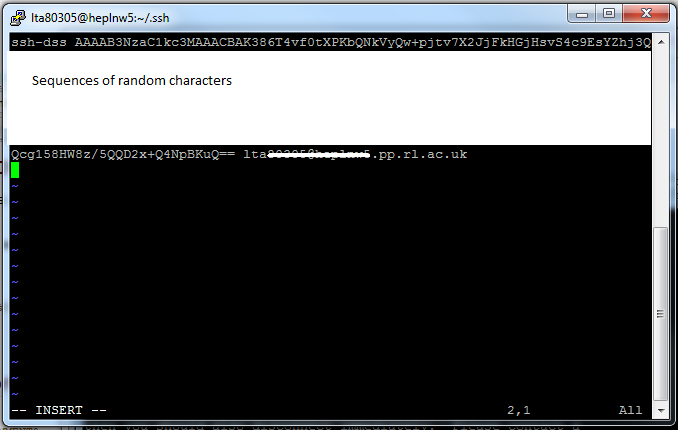
  • Go to the end of file and paste the public key as a new line (middle or right mouse buttons click when in text editing mode):
authkey3.png

  • Save, exit and close the PuTTY session. Now you need to tell PuTTY to use the new key pair.
  • Go back to the PuTTY main window, load your saved session settings from the Session tab.
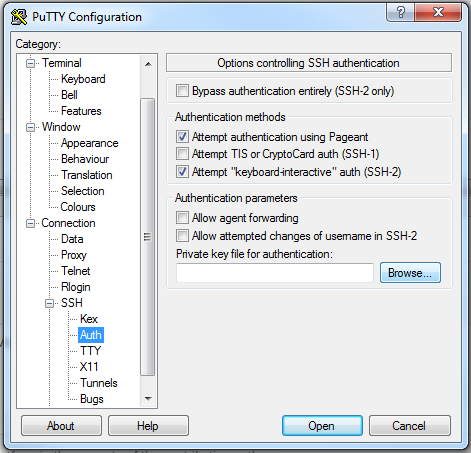
  • Go to Connection -> SSH -> Auth and click on "Browse":
PuTTYgen6.png

  • Select the private key file you saved previously and click "OK".
  • Go back to the Session screen, and save the new session settings for future use.
  • You are done! Try to connect: you should go straight to the shell prompt with no password request.

Possible issues

If you are still prompted for a password, try the following:

  • Make sure you did not miss any character in the copy/paste of the public key. If not sure, copy it again from the saved public key file and re-do the paste.
  • Check the authorized_keys permissions if creating a new file. They must be 644 (see the chmod man page).
  • Make sure your private key is loaded into the PuTTY session.
Changed:
<
<
-- federico melaccio - 2014-07-11
>
>

Automating Things with pagent

Added:
>
>
If you have protected your key with a passphrase (which you mush do) you will not be prompted for you Linux password by the remote machine and you will not be sending you password across the network (even encrypted) but you will still be prompted for you key passphrase each time, which is not much better for you.

To avoid that we need to use an agent to remember the private key for you, for putty the agent is called pagent, it should be in the same folder as PuTTYgen. When you start it up it appears not to have worked because no window opens up. What it has done in put a new icon in your system tray right click on that and select "Add Key", open the private key file you save from PuTTYgen and enter you passphrase when prompted (you do have a passphrase don't you).

Once you key is loaded up, start a new PuTTY session by right clicking on the pagent icon in the system tray and selecting "New Session". Then Load up the previous session that you saved and remove the "Private key file for authentication" under the Connection -> SSH -> Auth section, and click "Open" . You should get logged in without being prompted for an SSH key passphrase or for your Linux Password.

Open the putty config again, remove the "Private key file for authentication" again and this time save the config under the "Session" tab.

You should now be able to open as many sessions as you like by right clicking on the pagent icon and selecting your saved config under "Saved Sessions"

-- chris brew - 2018-11-09

 
META FILEATTACHMENT attachment="PuTTYgen1.png" attr="" comment="" date="1405078916" name="PuTTYgen1.png" path="PuTTYgen1.png" size="30592" user="FedericoMelaccio" version="1"
META FILEATTACHMENT attachment="PuTTYgen2.png" attr="" comment="" date="1405078930" name="PuTTYgen2.png" path="PuTTYgen2.png" size="34305" user="FedericoMelaccio" version="1"
META FILEATTACHMENT attachment="PuTTYgen3.png" attr="" comment="" date="1405078936" name="PuTTYgen3.png" path="PuTTYgen3.png" size="41091" user="FedericoMelaccio" version="1"
META FILEATTACHMENT attachment="PuTTYgen4.png" attr="" comment="" date="1405078943" name="PuTTYgen4.png" path="PuTTYgen4.png" size="42875" user="FedericoMelaccio" version="1"
META FILEATTACHMENT attachment="PuTTYgen5.png" attr="" comment="" date="1405078949" name="PuTTYgen5.png" path="PuTTYgen5.png" size="103268" user="FedericoMelaccio" version="1"
META FILEATTACHMENT attachment="PuTTYgen6.png" attr="" comment="" date="1405078957" name="PuTTYgen6.png" path="PuTTYgen6.png" size="36464" user="FedericoMelaccio" version="1"
META FILEATTACHMENT attachment="authkey1.png" attr="" comment="" date="1405078964" name="authkey1.png" path="authkey1.png" size="47049" user="FedericoMelaccio" version="1"
META FILEATTACHMENT attachment="authkey2.png" attr="" comment="" date="1405078969" name="authkey2.png" path="authkey2.png" size="50819" user="FedericoMelaccio" version="1"
META FILEATTACHMENT attachment="authkey3.png" attr="" comment="" date="1405078973" name="authkey3.png" path="authkey3.png" size="41218" user="FedericoMelaccio" version="1"

Revision 32016-04-19 - ChrisBrew

 
META TOPICPARENT name="WebHome"

How to use SSH keys with PuTTY

This article describes how to use PuTTY for passwordless SSH access via public/private key pairs.

  • Open the PuTTYgen utility which comes along the PuTTY suite of programs:
PuTTYgen1.png

  • Click on Generate to start generating a public/private key pair
  • You are asked to generate some randomness by moving the mouse on the area below the progress bar:
PuTTYgen2.png

  • When done the public key is shown and the Save buttons are enabled:
PuTTYgen3.png
Changed:
<
<
  • Optionally you can enter a passphrase to protect your private key. Leave fields blank if you do not want.
>
>
  • Optionally you can enter a passphrase to protect your private key, please do so!
 
  • Click on "Save private key":
PuTTYgen5.png

  • Enter a name and select a destination folder, then click "Save". IMPORTANT: This file MUST reside on your computer and it cannot leave it or be sent over any network.
  • Do likewise for the public key (click on "Save public key").
  • Now go back to the PuTTYgen main screen and select the public key with the mouse, right click on the selection and copy it.
  • Open a new PuTTY session to the Linux machine you want to connect via those SSH keys.
  • At prompt, cd to .ssh/ folder:
authkey1.png

  • With a text editor of your choice, open the authorized_keys file. If not existing, an empty one will be created:
authkey2.png

  • Go to the end of file and paste the public key as a new line (middle or right mouse buttons click when in text editing mode):
authkey3.png

  • Save, exit and close the PuTTY session. Now you need to tell PuTTY to use the new key pair.
  • Go back to the PuTTY main window, load your saved session settings from the Session tab.
  • Go to Connection -> SSH -> Auth and click on "Browse":
PuTTYgen6.png

  • Select the private key file you saved previously and click "OK".
  • Go back to the Session screen, and save the new session settings for future use.
  • You are done! Try to connect: you should go straight to the shell prompt with no password request.

Possible issues

If you are still prompted for a password, try the following:

  • Make sure you did not miss any character in the copy/paste of the public key. If not sure, copy it again from the saved public key file and re-do the paste.
  • Check the authorized_keys permissions if creating a new file. They must be 644 (see the chmod man page).
  • Make sure your private key is loaded into the PuTTY session.

-- federico melaccio - 2014-07-11

Deleted:
<
<
 
META FILEATTACHMENT attachment="PuTTYgen1.png" attr="" comment="" date="1405078916" name="PuTTYgen1.png" path="PuTTYgen1.png" size="30592" user="FedericoMelaccio" version="1"
META FILEATTACHMENT attachment="PuTTYgen2.png" attr="" comment="" date="1405078930" name="PuTTYgen2.png" path="PuTTYgen2.png" size="34305" user="FedericoMelaccio" version="1"
META FILEATTACHMENT attachment="PuTTYgen3.png" attr="" comment="" date="1405078936" name="PuTTYgen3.png" path="PuTTYgen3.png" size="41091" user="FedericoMelaccio" version="1"
META FILEATTACHMENT attachment="PuTTYgen4.png" attr="" comment="" date="1405078943" name="PuTTYgen4.png" path="PuTTYgen4.png" size="42875" user="FedericoMelaccio" version="1"
META FILEATTACHMENT attachment="PuTTYgen5.png" attr="" comment="" date="1405078949" name="PuTTYgen5.png" path="PuTTYgen5.png" size="103268" user="FedericoMelaccio" version="1"
META FILEATTACHMENT attachment="PuTTYgen6.png" attr="" comment="" date="1405078957" name="PuTTYgen6.png" path="PuTTYgen6.png" size="36464" user="FedericoMelaccio" version="1"
META FILEATTACHMENT attachment="authkey1.png" attr="" comment="" date="1405078964" name="authkey1.png" path="authkey1.png" size="47049" user="FedericoMelaccio" version="1"
META FILEATTACHMENT attachment="authkey2.png" attr="" comment="" date="1405078969" name="authkey2.png" path="authkey2.png" size="50819" user="FedericoMelaccio" version="1"
META FILEATTACHMENT attachment="authkey3.png" attr="" comment="" date="1405078973" name="authkey3.png" path="authkey3.png" size="41218" user="FedericoMelaccio" version="1"

Revision 22015-09-04 - ChrisBrew

 
META TOPICPARENT name="WebHome"

How to use SSH keys with PuTTY

This article describes how to use PuTTY for passwordless SSH access via public/private key pairs.

  • Open the PuTTYgen utility which comes along the PuTTY suite of programs:
PuTTYgen1.png

  • Click on Generate to start generating a public/private key pair
  • You are asked to generate some randomness by moving the mouse on the area below the progress bar:
PuTTYgen2.png

  • When done the public key is shown and the Save buttons are enabled:
PuTTYgen3.png

  • Optionally you can enter a passphrase to protect your private key. Leave fields blank if you do not want.
  • Click on "Save private key":
PuTTYgen5.png

  • Enter a name and select a destination folder, then click "Save". IMPORTANT: This file MUST reside on your computer and it cannot leave it or be sent over any network.
  • Do likewise for the public key (click on "Save public key").
  • Now go back to the PuTTYgen main screen and select the public key with the mouse, right click on the selection and copy it.
  • Open a new PuTTY session to the Linux machine you want to connect via those SSH keys.
  • At prompt, cd to .ssh/ folder:
authkey1.png

  • With a text editor of your choice, open the authorized_keys file. If not existing, an empty one will be created:
authkey2.png

  • Go to the end of file and paste the public key as a new line (middle or right mouse buttons click when in text editing mode):
authkey3.png

  • Save, exit and close the PuTTY session. Now you need to tell PuTTY to use the new key pair.
  • Go back to the PuTTY main window, load your saved session settings from the Session tab.
  • Go to Connection -> SSH -> Auth and click on "Browse":
PuTTYgen6.png

  • Select the private key file you saved previously and click "OK".
  • Go back to the Session screen, and save the new session settings for future use.
  • You are done! Try to connect: you should go straight to the shell prompt with no password request.

Possible issues

If you are still prompted for a password, try the following:

  • Make sure you did not miss any character in the copy/paste of the public key. If not sure, copy it again from the saved public key file and re-do the paste.
  • Check the authorized_keys permissions if creating a new file. They must be 644 (see the chmod man page).
  • Make sure your private key is loaded into the PuTTY session.

-- federico melaccio - 2014-07-11

Deleted:
<
<

Comments

<--/commentPlugin-->
 
META FILEATTACHMENT attachment="PuTTYgen1.png" attr="" comment="" date="1405078916" name="PuTTYgen1.png" path="PuTTYgen1.png" size="30592" user="FedericoMelaccio" version="1"
META FILEATTACHMENT attachment="PuTTYgen2.png" attr="" comment="" date="1405078930" name="PuTTYgen2.png" path="PuTTYgen2.png" size="34305" user="FedericoMelaccio" version="1"
META FILEATTACHMENT attachment="PuTTYgen3.png" attr="" comment="" date="1405078936" name="PuTTYgen3.png" path="PuTTYgen3.png" size="41091" user="FedericoMelaccio" version="1"
META FILEATTACHMENT attachment="PuTTYgen4.png" attr="" comment="" date="1405078943" name="PuTTYgen4.png" path="PuTTYgen4.png" size="42875" user="FedericoMelaccio" version="1"
META FILEATTACHMENT attachment="PuTTYgen5.png" attr="" comment="" date="1405078949" name="PuTTYgen5.png" path="PuTTYgen5.png" size="103268" user="FedericoMelaccio" version="1"
META FILEATTACHMENT attachment="PuTTYgen6.png" attr="" comment="" date="1405078957" name="PuTTYgen6.png" path="PuTTYgen6.png" size="36464" user="FedericoMelaccio" version="1"
META FILEATTACHMENT attachment="authkey1.png" attr="" comment="" date="1405078964" name="authkey1.png" path="authkey1.png" size="47049" user="FedericoMelaccio" version="1"
META FILEATTACHMENT attachment="authkey2.png" attr="" comment="" date="1405078969" name="authkey2.png" path="authkey2.png" size="50819" user="FedericoMelaccio" version="1"
META FILEATTACHMENT attachment="authkey3.png" attr="" comment="" date="1405078973" name="authkey3.png" path="authkey3.png" size="41218" user="FedericoMelaccio" version="1"

Revision 12014-07-11 - FedericoMelaccio

 
META TOPICPARENT name="WebHome"

How to use SSH keys with PuTTY

This article describes how to use PuTTY for passwordless SSH access via public/private key pairs.

  • Open the PuTTYgen utility which comes along the PuTTY suite of programs:
PuTTYgen1.png

  • Click on Generate to start generating a public/private key pair
  • You are asked to generate some randomness by moving the mouse on the area below the progress bar:
PuTTYgen2.png

  • When done the public key is shown and the Save buttons are enabled:
PuTTYgen3.png

  • Optionally you can enter a passphrase to protect your private key. Leave fields blank if you do not want.
  • Click on "Save private key":
PuTTYgen5.png

  • Enter a name and select a destination folder, then click "Save". IMPORTANT: This file MUST reside on your computer and it cannot leave it or be sent over any network.
  • Do likewise for the public key (click on "Save public key").
  • Now go back to the PuTTYgen main screen and select the public key with the mouse, right click on the selection and copy it.
  • Open a new PuTTY session to the Linux machine you want to connect via those SSH keys.
  • At prompt, cd to .ssh/ folder:
authkey1.png

  • With a text editor of your choice, open the authorized_keys file. If not existing, an empty one will be created:
authkey2.png

  • Go to the end of file and paste the public key as a new line (middle or right mouse buttons click when in text editing mode):
authkey3.png

  • Save, exit and close the PuTTY session. Now you need to tell PuTTY to use the new key pair.
  • Go back to the PuTTY main window, load your saved session settings from the Session tab.
  • Go to Connection -> SSH -> Auth and click on "Browse":
PuTTYgen6.png

  • Select the private key file you saved previously and click "OK".
  • Go back to the Session screen, and save the new session settings for future use.
  • You are done! Try to connect: you should go straight to the shell prompt with no password request.

Possible issues

If you are still prompted for a password, try the following:

  • Make sure you did not miss any character in the copy/paste of the public key. If not sure, copy it again from the saved public key file and re-do the paste.
  • Check the authorized_keys permissions if creating a new file. They must be 644 (see the chmod man page).
  • Make sure your private key is loaded into the PuTTY session.

-- federico melaccio - 2014-07-11

Comments

<--/commentPlugin-->

META FILEATTACHMENT attachment="PuTTYgen1.png" attr="" comment="" date="1405078916" name="PuTTYgen1.png" path="PuTTYgen1.png" size="30592" user="FedericoMelaccio" version="1"
META FILEATTACHMENT attachment="PuTTYgen2.png" attr="" comment="" date="1405078930" name="PuTTYgen2.png" path="PuTTYgen2.png" size="34305" user="FedericoMelaccio" version="1"
META FILEATTACHMENT attachment="PuTTYgen3.png" attr="" comment="" date="1405078936" name="PuTTYgen3.png" path="PuTTYgen3.png" size="41091" user="FedericoMelaccio" version="1"
META FILEATTACHMENT attachment="PuTTYgen4.png" attr="" comment="" date="1405078943" name="PuTTYgen4.png" path="PuTTYgen4.png" size="42875" user="FedericoMelaccio" version="1"
META FILEATTACHMENT attachment="PuTTYgen5.png" attr="" comment="" date="1405078949" name="PuTTYgen5.png" path="PuTTYgen5.png" size="103268" user="FedericoMelaccio" version="1"
META FILEATTACHMENT attachment="PuTTYgen6.png" attr="" comment="" date="1405078957" name="PuTTYgen6.png" path="PuTTYgen6.png" size="36464" user="FedericoMelaccio" version="1"
META FILEATTACHMENT attachment="authkey1.png" attr="" comment="" date="1405078964" name="authkey1.png" path="authkey1.png" size="47049" user="FedericoMelaccio" version="1"
META FILEATTACHMENT attachment="authkey2.png" attr="" comment="" date="1405078969" name="authkey2.png" path="authkey2.png" size="50819" user="FedericoMelaccio" version="1"
META FILEATTACHMENT attachment="authkey3.png" attr="" comment="" date="1405078973" name="authkey3.png" path="authkey3.png" size="41218" user="FedericoMelaccio" version="1"
 
This site is powered by the TWiki collaboration platform Powered by PerlCopyright © 2008-2024 by the contributing authors. All material on this collaboration platform is the property of the contributing authors.
Ideas, requests, problems regarding TWiki? Send feedback